<?xml version="1.0" encoding="utf-8"?><feed xmlns="http://www.w3.org/2005/Atom" ><generator uri="https://jekyllrb.com/" version="3.10.0">Jekyll</generator><link href="https://prasanthjayaraman.github.io/feed.xml" rel="self" type="application/atom+xml" /><link href="https://prasanthjayaraman.github.io/" rel="alternate" type="text/html" /><updated>2026-04-28T09:32:36+00:00</updated><id>https://prasanthjayaraman.github.io/feed.xml</id><title type="html">Prasanth J</title><subtitle>Thinking, Reading, Writing, Collecting, Designing, Coding, Developing, Debugging, Deploying and Playing Around...</subtitle><author><name>Prasanth J</name></author><entry><title type="html">React Native - Scale Android TV app for all TV resolutions</title><link href="https://prasanthjayaraman.github.io/javascript/react-native-android-tv-app-design/" rel="alternate" type="text/html" title="React Native - Scale Android TV app for all TV resolutions" /><published>2019-04-13T00:00:00+00:00</published><updated>2019-04-13T00:00:00+00:00</updated><id>https://prasanthjayaraman.github.io/javascript/react-native-android-tv-app-design</id><content type="html" xml:base="https://prasanthjayaraman.github.io/javascript/react-native-android-tv-app-design/"><![CDATA[<p>When i started working on a react-native project for android TV, i faced a very common scaling issue, how to design my application
that fit multiple screen sizes of different resolutions.</p>

<p>First let’s check the web (as many of us come from web background), In web development we can set <code class="language-plaintext highlighter-rouge">viewport</code> where we set content width
and initial scaling values. Also we have frameworks like Bootstrap, Foundation, UIKit, etc.</p>

<p>Now let’s come to react-native, In react-native we have <code class="language-plaintext highlighter-rouge">flexbox</code> which helps to provide consistent UI for different screen sizes.
But the flexbox alone is not helpful. We may also need to use <code class="language-plaintext highlighter-rouge">%</code> in the styles as <code class="language-plaintext highlighter-rouge">react-native@0.42</code> support % in the CSS styles.</p>

<p>But i had a thought that using ‘%’ is still not a recommended way where my application gonna be used in thousands of TVs of different
screen sizes. So i searched for a reliable soultion and found <a href="https://reactnative.dev/docs/dimensions"><strong>Dimensions</strong></a>
, <a href="https://reactnative.dev/docs/pixelratio"><strong>PixelRatio</strong></a> and <a href="https://www.npmjs.com/package/react-native-pixel-perfect"><strong>React Native Pixel Perfect</strong></a></p>

<h2 id="dimensions">Dimensions</h2>

<p><code class="language-plaintext highlighter-rouge">Dimensions</code> in react native helps to get the window’s width and height and also we can use the event listener available in the Dimensions
module to know if there is a change in window height and width.</p>

<div class="language-plaintext highlighter-rouge"><div class="highlight"><pre class="highlight"><code>const windowWidth = Dimensions.get('window').width;
const windowHeight = Dimensions.get('window').height;
</code></pre></div></div>

<h2 id="pixelratio">PixelRatio</h2>

<p><code class="language-plaintext highlighter-rouge">PixelRatio</code> in react native helps to get the device pixel density. Pixel density will varies device to device based on the resolution and pixels per inch (ppi).</p>

<p>For an mdpi android device <code class="language-plaintext highlighter-rouge">PixelRatio.get() === 1</code> and hdpi android device <code class="language-plaintext highlighter-rouge">PixelRatio.get() === 1.5</code> and <a href="https://material.io/resources/devices/"><strong>so on</strong></a>.</p>

<h2 id="react-native-pixel-perfect">React Native Pixel Perfect</h2>

<p><code class="language-plaintext highlighter-rouge">react-native-pixel-perfect</code> helps to create pixel perfect app of any screen sizes. It has a <code class="language-plaintext highlighter-rouge">create</code> function where we need to supply the device resolution so it generates a function which computes the correct size for different screen sizes.</p>

<div class="language-plaintext highlighter-rouge"><div class="highlight"><pre class="highlight"><code>const designResolution = {
    width: 1125,
    height: 2436
};
const perfectSize = create(designResolution);
perfectSize(50);
</code></pre></div></div>

<p><code class="language-plaintext highlighter-rouge">perfectSize(50)</code> will return the actual size needed to make 50 fit the screen perfectly according to original design. <code class="language-plaintext highlighter-rouge">50</code> is <code class="language-plaintext highlighter-rouge">50px</code> in CSS styles.</p>

<p>Let’s say for High Definition TVs</p>

<div class="language-plaintext highlighter-rouge"><div class="highlight"><pre class="highlight"><code>720p Resolution TV = 1280 x 720 (Total pixels = 921,600)
perfectSize(50) is 23.589
</code></pre></div></div>

<p>similarly,</p>

<div class="language-plaintext highlighter-rouge"><div class="highlight"><pre class="highlight"><code>1080p Resolution TV = 1920 x 1080 (Total pixels = 2,073,600)
perfetctSize(50) is 15.726
</code></pre></div></div>

<p>So using the module we can achieve pixel perfect application which reflects our UI design perfectly.</p>

<p>Now let’s combine all these together for a perfect and dynamic adaptive application.</p>

<div class="language-plaintext highlighter-rouge"><div class="highlight"><pre class="highlight"><code>import {PixelRatio, Dimensions} from 'react-native';
import {create} from 'react-native-pixel-perfect';

let displayProps = {
  width: PixelRatio.roundToNearestPixel(
    Dimensions.get('window').width * PixelRatio.get(),
  ),
  height: PixelRatio.roundToNearestPixel(
    Dimensions.get('window').height * PixelRatio.get(),
  ),
};

export const perfectSize = create(displayProps);
</code></pre></div></div>

<p>you can export the perfectSize fn and import it in any component to use it for pixel perfect size.</p>

<div class="language-plaintext highlighter-rouge"><div class="highlight"><pre class="highlight"><code>import { perfectSize } from './helper.js';

const styles = StyleSheet.create({
   container: {
    width: perfectSize(500),
    height: perfectSize(300)
   }
});
</code></pre></div></div>

<p>Finally achieved the design scaling for different screen sizes. :)</p>]]></content><author><name>Prasanth J</name></author><category term="Javascript" /><category term="React-Native" /><summary type="html"><![CDATA[When i started working on a react-native project for android TV, i faced a very common scaling issue, how to design my application that fit multiple screen sizes of different resolutions.]]></summary></entry><entry><title type="html">Angular - Convert any Html element to Image using canvas</title><link href="https://prasanthjayaraman.github.io/javascript/convet-div-to-image-in-angular/" rel="alternate" type="text/html" title="Angular - Convert any Html element to Image using canvas" /><published>2019-01-12T00:00:00+00:00</published><updated>2019-01-12T00:00:00+00:00</updated><id>https://prasanthjayaraman.github.io/javascript/convet-div-to-image-in-angular</id><content type="html" xml:base="https://prasanthjayaraman.github.io/javascript/convet-div-to-image-in-angular/"><![CDATA[<p>Sometimes you need to convert your entire div or web page to an image. So, I am going to convert a div or HTML to image with using angular module <a href="https://html2canvas.hertzen.com/"><strong>html2canvas</strong> </a></p>

<p>The screenshot is based on the DOM and as such may not be 100% accurate to the real representation as it does not make an actual screenshot, but builds the screenshot based on the information available on the page. The library should work fine on the following browsers (with Promise polyfill):</p>

<ul>
  <li>Firefox 3.5+</li>
  <li>Google Chrome</li>
  <li>Opera 12+</li>
  <li>IE9+</li>
  <li>Safari 6+</li>
</ul>

<p>As each CSS property needs to be manually built to be supported, there are a number of properties that are not yet supported. It does not require any rendering from the server, as the whole image is created on the clients browser. It doesn’t magically circumvent any browser content policy restrictions either, so rendering cross-origin content will require a proxy to get the content to the same origin.</p>

<h2 id="requirements">Requirements</h2>

<p>Install the library in the application using <strong>NPM</strong> or if you prefer <strong>Bower</strong>.</p>

<div class="language-javascript highlighter-rouge"><div class="highlight"><pre class="highlight"><code>    <span class="nx">npm</span> <span class="nx">isntall</span> <span class="nx">html2canvas</span>

    <span class="c1">// or</span>

    <span class="nx">bower</span> <span class="nx">install</span> <span class="nx">html2canvas</span>
</code></pre></div></div>
<p>Incase if you are using this for a plain javascript web application then you can simply add the reference to the script with a script tag. <a href="https://html2canvas.hertzen.com/">html2canvas.min.js</a></p>

<div class="language-javascript highlighter-rouge"><div class="highlight"><pre class="highlight"><code>    <span class="o">&lt;</span><span class="nx">script</span> <span class="nx">src</span><span class="o">=</span><span class="dl">"</span><span class="s2">/path/to/html2canvas.min.js</span><span class="dl">"</span><span class="o">&gt;&lt;</span><span class="sr">/script</span><span class="err">&gt;
</span></code></pre></div></div>

<h2 id="create-screenshot-using-html2canvas">Create Screenshot using html2canvas</h2>

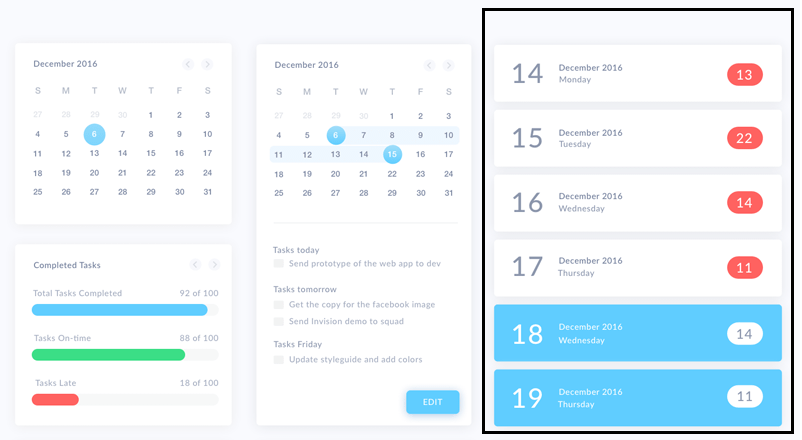
<p>Let’s say you want to capture screenshot of div in you web application. In the below image the black highlighted part is the div you need to capture. So first make sure you hav set an <code class="language-plaintext highlighter-rouge">id</code> to the element.</p>

<p><a href="https://prasanthj.com/assets/uploads/html2canvas-1.png"><img src="https://prasanthj.com/assets/uploads/html2canvas-1.png" alt="screenshot1" /></a></p>

<p>The <strong>html2canvas</strong> is a simple library, the function expects an argument which is the DOM element of the web page in other words the DOM element which you want to export as image.</p>

<div class="language-javascript highlighter-rouge"><div class="highlight"><pre class="highlight"><code>    <span class="kd">let</span> <span class="nx">element</span> <span class="o">=</span> <span class="nb">document</span><span class="p">.</span><span class="nx">querySelector</span><span class="p">(</span><span class="dl">"</span><span class="s2">#capture</span><span class="dl">"</span><span class="p">);</span>
    <span class="nx">html2canvas</span><span class="p">(</span><span class="nb">document</span><span class="p">).</span><span class="nx">then</span><span class="p">(</span><span class="kd">function</span><span class="p">(</span><span class="nx">canvas</span><span class="p">)</span> <span class="p">{</span>
        <span class="c1">// Convert the canvas to blob</span>
        <span class="nx">canvas</span><span class="p">.</span><span class="nx">toBlob</span><span class="p">(</span><span class="kd">function</span><span class="p">(</span><span class="nx">blob</span><span class="p">){</span>
            <span class="c1">// To download directly on browser default 'downloads' location</span>
            <span class="kd">let</span> <span class="nx">link</span> <span class="o">=</span> <span class="nb">document</span><span class="p">.</span><span class="nx">createElement</span><span class="p">(</span><span class="dl">"</span><span class="s2">a</span><span class="dl">"</span><span class="p">);</span>
            <span class="nx">link</span><span class="p">.</span><span class="nx">download</span> <span class="o">=</span> <span class="dl">"</span><span class="s2">image.png</span><span class="dl">"</span><span class="p">;</span>
            <span class="nx">link</span><span class="p">.</span><span class="nx">href</span> <span class="o">=</span> <span class="nx">URL</span><span class="p">.</span><span class="nx">createObjectURL</span><span class="p">(</span><span class="nx">blob</span><span class="p">);</span>
            <span class="nx">link</span><span class="p">.</span><span class="nx">click</span><span class="p">();</span>

            <span class="c1">// To save manually somewhere in file explorer</span>
            <span class="nb">window</span><span class="p">.</span><span class="nx">saveAs</span><span class="p">(</span><span class="nx">blob</span><span class="p">,</span> <span class="dl">'</span><span class="s1">image.png</span><span class="dl">'</span><span class="p">);</span>

        <span class="p">},</span><span class="dl">'</span><span class="s1">image/png</span><span class="dl">'</span><span class="p">);</span>
    <span class="p">});</span>
</code></pre></div></div>

<p>Once the element is passed to the <code class="language-plaintext highlighter-rouge">html2canvas</code> window function then a promise is returned with the <code class="language-plaintext highlighter-rouge">canvas</code> of the div. Use the function <code class="language-plaintext highlighter-rouge">canvas.toBlob()</code> to convert it to the canvas to a blob and from blob you can create a url out of it using <code class="language-plaintext highlighter-rouge">URL.createObjectURL()</code>.</p>

<p>To download automatically to default browser ‘Downloads’ location, Create an anchor element and assign the link to the href and make a click so it will automatically download the data.</p>

<p>To allow user to save manually in their machine, use <code class="language-plaintext highlighter-rouge">window.saveAs()</code> function.</p>

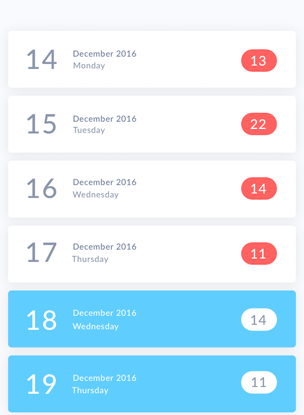
<p>The downloaded image will be like this finally..</p>

<p><a href="https://prasanthj.com/assets/uploads/html2canvas-2.png"><img src="https://prasanthj.com/assets/uploads/html2canvas-2.png" alt="screenshot2" /></a></p>]]></content><author><name>Prasanth J</name></author><category term="Javascript" /><category term="Angular" /><summary type="html"><![CDATA[Sometimes you need to convert your entire div or web page to an image. So, I am going to convert a div or HTML to image with using angular module html2canvas]]></summary></entry><entry><title type="html">Angular 7 - Observables Tutorial for Components Communication</title><link href="https://prasanthjayaraman.github.io/javascript/angular-observables-tutorial-for-components-communication/" rel="alternate" type="text/html" title="Angular 7 - Observables Tutorial for Components Communication" /><published>2018-12-21T00:00:00+00:00</published><updated>2018-12-21T00:00:00+00:00</updated><id>https://prasanthjayaraman.github.io/javascript/angular-observables-tutorial-for-components-communication</id><content type="html" xml:base="https://prasanthjayaraman.github.io/javascript/angular-observables-tutorial-for-components-communication/"><![CDATA[<p>The best way to communicate between angular components is to use an <strong>Observables</strong>. I won’t go too much into the details about how observables work here since it’s a big subject. So will explain in simple terms and dive directly with the code. Before starting i hope you know what is components in angular, if not, this <a href="https://www.toptal.com/angular/angular-components-overview-101">article</a> can help you to get started.</p>

<h1 id="observables">Observables</h1>

<p>Observables are lazy collections of muliple values over time. Let’s take it in more simple way..</p>

<h2 id="observables-are-lazy">Observables are lazy</h2>

<p>You could think of observables as newsletters. For each subscriber a new newsletter is created. They are then only send to those people, and not to anyone else.</p>

<h2 id="observables-can-have-multiple-values-over-time">Observables can have multiple values over time</h2>

<p>Now if you keep that subscription to the newsletter open, you will get a new one every once and a while. The sender decides when you get it but all you have to do is just wait until it comes straight into your inbox.</p>

<h1 id="lets-create-an-observable">Lets Create an Observable</h1>

<p>If you start using Angular you will probably encounter observables when setting up your HTTP requests. So let’s start there.</p>

<p>Below is an example service, which pass students data to the subscribers through observables. Here, instead making a Http call, i’m using local data to send.</p>

<h2 id="creating-observables">Creating observables</h2>
<p>Creating observables is easy, just call the new Observable() and pass along one argument which represents the observer. Therefore i usually call it <strong>observer</strong> as well.</p>

<div class="language-javascript highlighter-rouge"><div class="highlight"><pre class="highlight"><code><span class="c1">// student.services.ts </span>

  <span class="k">import</span> <span class="p">{</span> <span class="nx">Injectable</span> <span class="p">}</span> <span class="k">from</span> <span class="dl">'</span><span class="s1">@angular/core</span><span class="dl">'</span><span class="p">;</span>
  <span class="k">import</span> <span class="p">{</span> <span class="nx">Observable</span> <span class="p">}</span> <span class="k">from</span> <span class="dl">'</span><span class="s1">rxjs</span><span class="dl">'</span><span class="p">;</span>

  <span class="p">@</span><span class="nd">Injectable</span><span class="p">({</span>
    <span class="na">providedIn</span><span class="p">:</span> <span class="dl">'</span><span class="s1">root</span><span class="dl">'</span>
  <span class="p">})</span>
  <span class="k">export</span> <span class="kd">class</span> <span class="nx">StudentService</span> <span class="p">{</span>

  <span class="nx">students</span> <span class="o">=</span> <span class="p">[{</span>
      <span class="na">id</span><span class="p">:</span> <span class="mi">1</span><span class="p">,</span>
      <span class="na">name</span><span class="p">:</span> <span class="dl">'</span><span class="s1">Prasanth</span><span class="dl">'</span><span class="p">,</span>
      <span class="na">enrollmentnumber</span><span class="p">:</span> <span class="mi">110201501126</span><span class="p">,</span>
      <span class="na">college</span><span class="p">:</span> <span class="dl">'</span><span class="s1">SNS College of Engineering</span><span class="dl">'</span><span class="p">,</span>
      <span class="na">university</span><span class="p">:</span> <span class="dl">'</span><span class="s1">AU</span><span class="dl">'</span>
  <span class="p">},</span>
  <span class="p">{</span>
      <span class="na">id</span><span class="p">:</span> <span class="mi">2</span><span class="p">,</span>
      <span class="na">name</span><span class="p">:</span> <span class="dl">'</span><span class="s1">Mohan</span><span class="dl">'</span><span class="p">,</span>
      <span class="na">enrollmentnumber</span><span class="p">:</span> <span class="mi">110470116027</span><span class="p">,</span>
      <span class="na">college</span><span class="p">:</span> <span class="dl">'</span><span class="s1">SNS College of Engineering</span><span class="dl">'</span><span class="p">,</span>
      <span class="na">university</span><span class="p">:</span> <span class="dl">'</span><span class="s1">AU</span><span class="dl">'</span>
  <span class="p">}];</span>

  <span class="kd">constructor</span><span class="p">()</span> <span class="p">{</span> <span class="p">}</span>

  <span class="kr">public</span> <span class="nx">getStudents</span><span class="p">():</span> <span class="nx">any</span> <span class="p">{</span>
     <span class="kd">const</span> <span class="nx">studentsObservable</span> <span class="o">=</span> <span class="k">new</span> <span class="nx">Observable</span><span class="p">(</span><span class="nx">observer</span> <span class="o">=&gt;</span> <span class="p">{</span>
            <span class="nx">setTimeout</span><span class="p">(()</span> <span class="o">=&gt;</span> <span class="p">{</span>
                <span class="nx">observer</span><span class="p">.</span><span class="nx">next</span><span class="p">(</span><span class="k">this</span><span class="p">.</span><span class="nx">students</span><span class="p">);</span>
            <span class="p">},</span> <span class="mi">1000</span><span class="p">);</span>
     <span class="p">});</span>

     <span class="k">return</span> <span class="nx">studentsObservable</span><span class="p">;</span>
 <span class="p">}</span>
<span class="p">}</span>
</code></pre></div></div>
<p>When <code class="language-plaintext highlighter-rouge">observer.next()</code> is called in the observables the data passed inside the <code class="language-plaintext highlighter-rouge">next()</code> is sent to all the subscribers across the application. Now we have created an observable, lets subscribe to this observables in a component.</p>

<h2 id="subscribing-to-observables">Subscribing to observables</h2>
<p>Remember, observables are lazy. If you don’t subscribe nothing is going to happen. It’s good to know that when you subscribe to an observer, each call of subscribe() will trigger it’s own independent execution for that given observer. Subscribe calls are not shared among multiple subscribers to the same observable.</p>

<div class="language-javascript highlighter-rouge"><div class="highlight"><pre class="highlight"><code>  <span class="c1">// app.component.ts</span>

  <span class="k">import</span> <span class="p">{</span> <span class="nx">Component</span><span class="p">,</span> <span class="nx">OnInit</span><span class="p">,</span> <span class="nx">OnDestroy</span> <span class="p">}</span> <span class="k">from</span> <span class="dl">'</span><span class="s1">@angular/core</span><span class="dl">'</span><span class="p">;</span>
  <span class="k">import</span> <span class="p">{</span> <span class="nx">Subscription</span> <span class="p">}</span> <span class="k">from</span> <span class="dl">'</span><span class="s1">rxjs</span><span class="dl">'</span><span class="p">;</span>
  <span class="k">import</span> <span class="p">{</span> <span class="nx">StudentService</span> <span class="p">}</span> <span class="k">from</span> <span class="dl">'</span><span class="s1">./student.service</span><span class="dl">'</span><span class="p">;</span>

  <span class="p">@</span><span class="nd">Component</span><span class="p">({</span>
    <span class="na">selector</span><span class="p">:</span> <span class="dl">'</span><span class="s1">app-root</span><span class="dl">'</span><span class="p">,</span>
    <span class="na">templateUrl</span><span class="p">:</span> <span class="dl">'</span><span class="s1">./app.component.html</span><span class="dl">'</span><span class="p">,</span>
    <span class="na">styleUrls</span><span class="p">:</span> <span class="p">[</span><span class="dl">'</span><span class="s1">./app.component.css</span><span class="dl">'</span><span class="p">]</span>
  <span class="p">})</span>
  <span class="k">export</span> <span class="kd">class</span> <span class="nx">AppComponent</span> <span class="kr">implements</span> <span class="nx">OnInit</span> <span class="p">{</span>

      <span class="nx">students</span> <span class="o">=</span> <span class="p">[];</span>
      <span class="nl">studentsObservable</span><span class="p">:</span> <span class="nx">Subscription</span><span class="p">;</span>

      <span class="kd">constructor</span><span class="p">(</span><span class="kr">private</span> <span class="nx">studentservice</span><span class="p">:</span> <span class="nx">StudentService</span><span class="p">)</span> <span class="p">{}</span>

      <span class="nx">ngOnInit</span><span class="p">()</span> <span class="p">{</span>
          <span class="k">this</span><span class="p">.</span><span class="nx">studentsObservable</span> <span class="o">=</span> <span class="k">this</span><span class="p">.</span><span class="nx">studentservice</span><span class="p">.</span><span class="nx">getStudents</span><span class="p">();</span>
          <span class="nx">studentsObservable</span><span class="p">.</span><span class="nx">subscribe</span><span class="p">((</span><span class="nx">studentsData</span><span class="p">)</span> <span class="o">=&gt;</span> <span class="p">{</span>
              <span class="k">this</span><span class="p">.</span><span class="nx">students</span> <span class="o">=</span> <span class="nx">studentsData</span><span class="p">;</span>
          <span class="p">});</span>
      <span class="p">}</span>
  <span class="p">}</span>
</code></pre></div></div>

<h2 id="unsubscribing-to-observables">Unsubscribing to Observables</h2>
<p>Unsubscribing is necessary, it is important that we unsubscribe from any subscriptions that we create in our Angular components when the component is destroyed to avoid memory leaks.</p>

<div class="language-javascript highlighter-rouge"><div class="highlight"><pre class="highlight"><code>  <span class="c1">// app.component.ts</span>

   <span class="nx">ngOnDestroy</span><span class="p">()</span> <span class="p">{</span>
        <span class="c1">// unsubscribe to ensure no memory leaks</span>
        <span class="k">this</span><span class="p">.</span><span class="nx">studentsObservable</span><span class="p">.</span><span class="nx">unsubscribe</span><span class="p">();</span>
    <span class="p">}</span>
</code></pre></div></div>

<h2 id="error-handling">Error handling</h2>
<p>One of the most difficult tasks in asynchronous programming is dealing with errors. Unlike interactive style programming, we cannot simply use the try/catch/finally approach that we use when dealing with blocking code. So In the sense of Observables, you can handle the errors by specifying an error callback on the observer.</p>

<div class="language-javascript highlighter-rouge"><div class="highlight"><pre class="highlight"><code>  <span class="c1">// app.component.ts</span>
  <span class="nx">studentsObservable</span><span class="p">.</span><span class="nx">subscribe</span><span class="p">({</span>
    <span class="nx">studentsData</span> <span class="o">=&gt;</span> <span class="nx">console</span><span class="p">.</span><span class="nx">log</span><span class="p">(</span><span class="nx">studentsData</span><span class="p">),</span>
    <span class="nx">err</span> <span class="o">=&gt;</span> <span class="nx">console</span><span class="p">.</span><span class="nx">log</span><span class="p">(</span><span class="nx">err</span><span class="p">)</span>
  <span class="p">});</span>
</code></pre></div></div>
<p>Producing an error also causes the observable to clean up subscriptions and stop producing values. An observable can either produce the values (calling the next callback), or it can complete, calling either the complete or error callback.</p>]]></content><author><name>Prasanth J</name></author><category term="Javascript" /><category term="Angular" /><summary type="html"><![CDATA[The best way to communicate between angular components is to use an Observables. I won’t go too much into the details about how observables work here since it’s a big subject. So will explain in simple terms and dive directly with the code. Before starting i hope you know what is components in angular, if not, this article can help you to get started.]]></summary></entry><entry><title type="html">NodeJs - Send Push Notifications to devices using firebase</title><link href="https://prasanthjayaraman.github.io/javascript/send-push-notifcations-to-devices-using-nodejs/" rel="alternate" type="text/html" title="NodeJs - Send Push Notifications to devices using firebase" /><published>2018-11-07T00:00:00+00:00</published><updated>2018-11-07T00:00:00+00:00</updated><id>https://prasanthjayaraman.github.io/javascript/send-push-notifcations-to-devices-using-nodejs</id><content type="html" xml:base="https://prasanthjayaraman.github.io/javascript/send-push-notifcations-to-devices-using-nodejs/"><![CDATA[<p>You can send push notifications to any android devices using <a href="https://firebase.google.com/"><strong>Firebase</strong></a>. I will explain you how to get the key from the firebase project and write a simple nodejs code using library <strong>fcm-node</strong> to send push notifications to android devices.</p>

<h2 id="requirements">Requirements</h2>

<p>To start with, You should have a firebase account, i will consider you have an firebase account else create one.</p>

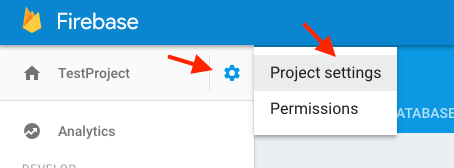
<p>Go to <a href="https://console.firebase.google.com/">Firebase Console</a> and select your project or create a project. Select the <strong>Settings icon</strong> and click <strong>Project settings</strong></p>

<p><a href="https://prasanthj.com/assets/uploads/firebase-1.png"><img src="https://prasanthj.com/assets/uploads/firebase-1.png" alt="screenshot1" /></a></p>

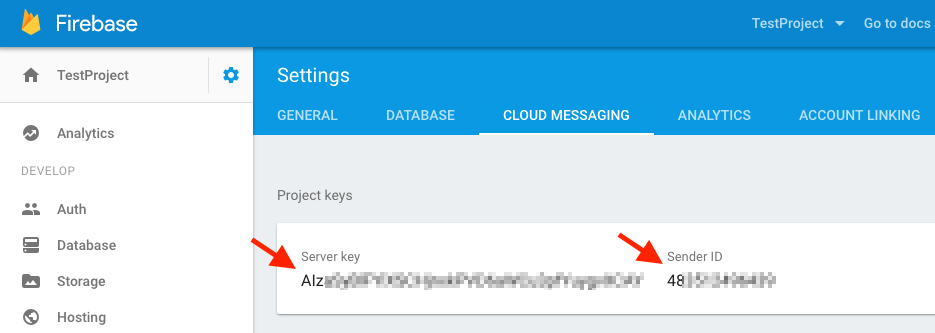
<p>Select <strong>Could Messaging</strong> tab and copy <strong>Server API</strong> key, we need to use this in nodejs applciation.</p>

<p><a href="https://prasanthj.com/assets/uploads/firebase-2.png"><img src="https://prasanthj.com/assets/uploads/firebase-2.png" alt="screenshot2" /></a></p>

<hr />

<p>Now install the <a href="https://www.npmjs.com/package/fcm-node"><strong>fcm-node</strong></a> in your nodejs project.</p>

<div class="language-javascript highlighter-rouge"><div class="highlight"><pre class="highlight"><code>    <span class="nx">npm</span> <span class="nx">install</span> <span class="nx">fcm</span><span class="o">-</span><span class="nx">node</span>
</code></pre></div></div>

<p>This is a simple nodejs firebase cloud messaging library which sends push to one or multiple devices using a function <code class="language-plaintext highlighter-rouge">fcm.send</code>, it also supports promises instead callbacks. Do not forget to get the android device token from your android device and save it in your database.</p>

<div class="language-javascript highlighter-rouge"><div class="highlight"><pre class="highlight"><code>    <span class="c1">// Notifications.js</span>

    <span class="kd">var</span> <span class="nx">FCM</span> <span class="o">=</span> <span class="nx">require</span><span class="p">(</span><span class="dl">'</span><span class="s1">fcm-node</span><span class="dl">'</span><span class="p">);</span>
    <span class="kd">var</span> <span class="nx">serverKey</span> <span class="o">=</span> <span class="dl">'</span><span class="s1">YOURSERVERKEYHERE</span><span class="dl">'</span><span class="p">;</span> <span class="c1">// put your server key here</span>
    <span class="kd">var</span> <span class="nx">fcm</span> <span class="o">=</span> <span class="k">new</span> <span class="nx">FCM</span><span class="p">(</span><span class="nx">serverKey</span><span class="p">);</span>
 
    <span class="kd">var</span> <span class="nx">message</span> <span class="o">=</span> <span class="p">{</span> <span class="c1">//this may vary according to the message type (single recipient, multicast, topic, et cetera)</span>
        <span class="na">to</span><span class="p">:</span> <span class="dl">'</span><span class="s1">registration_token</span><span class="dl">'</span><span class="p">,</span> 
        <span class="na">collapse_key</span><span class="p">:</span> <span class="dl">'</span><span class="s1">your_collapse_key</span><span class="dl">'</span><span class="p">,</span>
        
        <span class="na">notification</span><span class="p">:</span> <span class="p">{</span>
            <span class="na">title</span><span class="p">:</span> <span class="dl">'</span><span class="s1">Title of your push notification</span><span class="dl">'</span><span class="p">,</span> 
            <span class="na">body</span><span class="p">:</span> <span class="dl">'</span><span class="s1">Body of your push notification</span><span class="dl">'</span> 
        <span class="p">},</span>
        
        <span class="na">data</span><span class="p">:</span> <span class="p">{</span>  <span class="c1">//you can send only notification or only data(or include both)</span>
            <span class="na">my_key</span><span class="p">:</span> <span class="dl">'</span><span class="s1">my value</span><span class="dl">'</span><span class="p">,</span>
            <span class="na">my_another_key</span><span class="p">:</span> <span class="dl">'</span><span class="s1">my another value</span><span class="dl">'</span>
        <span class="p">}</span>
    <span class="p">};</span>
    
    <span class="nx">fcm</span><span class="p">.</span><span class="nx">send</span><span class="p">(</span><span class="nx">message</span><span class="p">,</span> <span class="kd">function</span><span class="p">(</span><span class="nx">err</span><span class="p">,</span> <span class="nx">response</span><span class="p">){</span>
        <span class="k">if</span> <span class="p">(</span><span class="nx">err</span><span class="p">)</span> <span class="p">{</span>
            <span class="nx">console</span><span class="p">.</span><span class="nx">log</span><span class="p">(</span><span class="dl">"</span><span class="s2">Something has gone wrong!</span><span class="dl">"</span><span class="p">);</span>
        <span class="p">}</span> <span class="k">else</span> <span class="p">{</span>
            <span class="nx">console</span><span class="p">.</span><span class="nx">log</span><span class="p">(</span><span class="dl">"</span><span class="s2">Successfully sent with response: </span><span class="dl">"</span><span class="p">,</span> <span class="nx">response</span><span class="p">);</span>
        <span class="p">}</span>
    <span class="p">});</span>
</code></pre></div></div>

<p>You can collapse multiple notifcations of same application in your android device with <code class="language-plaintext highlighter-rouge">collapse_key</code> and maximum of 4 collapse key is used.</p>

<p>With <code class="language-plaintext highlighter-rouge">fcm-node</code> you can send notifications to multiple devices by replacing <code class="language-plaintext highlighter-rouge">to</code> with <code class="language-plaintext highlighter-rouge">registration_ids</code> in the message object.</p>

<div class="language-javascript highlighter-rouge"><div class="highlight"><pre class="highlight"><code>    <span class="kd">var</span> <span class="nx">message</span> <span class="o">=</span> <span class="p">{</span> 
        <span class="na">registration_ids</span><span class="p">:</span> <span class="p">[</span><span class="dl">'</span><span class="s1">registration_tokens</span><span class="dl">'</span><span class="p">],</span> <span class="c1">// Multiple tokens in an array</span>
        <span class="na">collapse_key</span><span class="p">:</span> <span class="dl">'</span><span class="s1">your_collapse_key</span><span class="dl">'</span><span class="p">,</span>
        
        <span class="na">notification</span><span class="p">:</span> <span class="p">{</span>
            <span class="na">title</span><span class="p">:</span> <span class="dl">'</span><span class="s1">Title of your push notification</span><span class="dl">'</span><span class="p">,</span> 
            <span class="na">body</span><span class="p">:</span> <span class="dl">'</span><span class="s1">Body of your push notification</span><span class="dl">'</span> 
        <span class="p">},</span>
        
        <span class="na">data</span><span class="p">:</span> <span class="p">{</span>  <span class="c1">//you can send only notification or only data(or include both)</span>
            <span class="na">my_key</span><span class="p">:</span> <span class="dl">'</span><span class="s1">my value</span><span class="dl">'</span><span class="p">,</span>
            <span class="na">my_another_key</span><span class="p">:</span> <span class="dl">'</span><span class="s1">my another value</span><span class="dl">'</span>
        <span class="p">}</span>
    <span class="p">};</span>
</code></pre></div></div>

<p><strong>Note:</strong> Device registration token in android will be updated some time so make sure you are sending to the notifications with latest device tokens.</p>]]></content><author><name>Prasanth J</name></author><category term="Javascript" /><category term="NodeJs" /><summary type="html"><![CDATA[You can send push notifications to any android devices using Firebase. I will explain you how to get the key from the firebase project and write a simple nodejs code using library fcm-node to send push notifications to android devices.]]></summary></entry><entry><title type="html">Common Misconception of NodeJs Event Loop</title><link href="https://prasanthjayaraman.github.io/javascript/misconception-of-node-event-loop/" rel="alternate" type="text/html" title="Common Misconception of NodeJs Event Loop" /><published>2018-03-04T00:00:00+00:00</published><updated>2018-03-04T00:00:00+00:00</updated><id>https://prasanthjayaraman.github.io/javascript/misconception-of-node-event-loop</id><content type="html" xml:base="https://prasanthjayaraman.github.io/javascript/misconception-of-node-event-loop/"><![CDATA[<p>Node.js is an event-driven programming environment. This means that everything that happens in Node is the reaction to an event. 
A transaction passing through Node traverses a cascade of callbacks. Abstracted away from the developer, this is all handled by a 
library called libuv which provides a mechanism called an event loop.</p>

<p>This event loop is maybe the most misunderstood concept of the platform. I interviewed many people, most of the people have these kind of
misconceptions. So some of the misconceptions are here..</p>

<h2 id="misconception-1-the-event-loop-runs-in-a-separate-thread-than-the-user-code">Misconception 1: The event loop runs in a separate thread than the user code</h2>

<h3 id="misconception">Misconception:</h3>

<p>There is a main thread where the JavaScript code of the user (userland code) runs in and another one that runs the event loop. Every time an asynchronous operation takes place, the main thread will hand over the work to the event loop thread and once it is done, the event loop thread will ping the main thread to execute a callback.</p>

<h3 id="reality">Reality:</h3>

<p>There is only one thread that executes JavaScript code and this is the thread where the event loop is running. The execution of callbacks (know that every userland code in a running Node.js application is a callback) is done by the event loop. We will cover that in depth a bit later.</p>

<h2 id="misconception-2-everything-thats-asynchronous-is-handled-by-a-thread-pool">Misconception 2: Everything that’s asynchronous is handled by a thread pool</h2>

<h3 id="misconception-1">Misconception:</h3>

<p>Asynchronous operations, like working with the filesystems, doing outbound HTTP requests or talking to databases are always loaded off to a thread pool provided by libuv.</p>

<h3 id="reality-1">Reality:</h3>

<p>Libuv by default creates a thread pool with four threads to offload asynchronous work to. Today’s operating systems already provide asynchronous interfaces for many I/O tasks (e.g. AIO on Linux). Whenever possible, libuv will use those asynchronous interfaces, avoiding usage of the thread pool. The same applies to third party subsystems like databases. Here the authors of the driver will rather use the asynchronous interface than utilizing a thread pool. In short: Only if there is no other way, the thread pool will be used for asynchronous I/O.</p>

<h2 id="misconception-3-the-event-loop-is-something-like-a-stack-or-queue">Misconception 3: The event loop is something like a stack or queue</h2>

<h3 id="misconception-2">Misconception:</h3>

<p>The event loop continuously traverses a FIFO of asynchronous tasks and executes the callback when a task is completed.</p>

<h3 id="reality-2">Reality:</h3>

<p>While there are queue-like structures involved, the event loop does not run through and process a stack. The event loop as a process is a set of phases with specific tasks that are processed in a round-robin manner.</p>

<p>Philip Roberts has explained <a href="https://www.youtube.com/watch?v=8aGhZQkoFbQ">here</a> very clearly about what is the event loop and how does it work in run time with clean simulation of the engine.</p>]]></content><author><name>Prasanth J</name></author><category term="Javascript" /><category term="NodeJs" /><summary type="html"><![CDATA[Node.js is an event-driven programming environment. This means that everything that happens in Node is the reaction to an event. A transaction passing through Node traverses a cascade of callbacks. Abstracted away from the developer, this is all handled by a library called libuv which provides a mechanism called an event loop.]]></summary></entry><entry><title type="html">Javascript - Map(), Filter() and Reduce() Simplified</title><link href="https://prasanthjayaraman.github.io/javascript/Javascript-map-filter-reduce/" rel="alternate" type="text/html" title="Javascript - Map(), Filter() and Reduce() Simplified" /><published>2018-01-17T00:00:00+00:00</published><updated>2018-01-17T00:00:00+00:00</updated><id>https://prasanthjayaraman.github.io/javascript/Javascript-map-filter-reduce</id><content type="html" xml:base="https://prasanthjayaraman.github.io/javascript/Javascript-map-filter-reduce/"><![CDATA[<p>If you’re starting in JavaScript, maybe you already heard of <code class="language-plaintext highlighter-rouge">.map()</code>, <code class="language-plaintext highlighter-rouge">.reduce()</code>, and <code class="language-plaintext highlighter-rouge">.filter()</code>. You may confused what the use of it and how does it work. Once you start working on large applications you will encounter number of scenarios where you need to you these functions.</p>

<p>I will explain in simple way you can understand these and will give you some examples when you can use these. Okay, Let’s move on and start the article.. I</p>

<h2 id="map">map()</h2>

<p>The <code class="language-plaintext highlighter-rouge">map()</code> method creates a new array with the results of calling a provided function on every element in the calling array.</p>

<div class="language-javascript highlighter-rouge"><div class="highlight"><pre class="highlight"><code>    <span class="kd">const</span> <span class="nx">numbers</span> <span class="o">=</span> <span class="p">[</span><span class="mi">25</span><span class="p">,</span> <span class="mi">50</span><span class="p">,</span> <span class="mi">75</span><span class="p">,</span> <span class="mi">100</span><span class="p">];</span>
    <span class="kd">const</span> <span class="nx">halves</span> <span class="o">=</span> <span class="nx">numbers</span><span class="p">.</span><span class="nx">map</span><span class="p">(</span><span class="nx">x</span> <span class="o">=&gt;</span> <span class="nx">x</span> <span class="o">/</span> <span class="mi">5</span><span class="p">);</span>
    <span class="c1">// halves is [5, 10, 15, 20]</span>
</code></pre></div></div>

<p>Map is used when you have an array of values and you want to do something for every item in that array.</p>

<h3 id="example">Example:</h3>

<ul>
  <li>Think of processing each element with given formula.</li>
</ul>

<div class="language-javascript highlighter-rouge"><div class="highlight"><pre class="highlight"><code>    <span class="kd">const</span> <span class="nx">celsius</span> <span class="o">=</span> <span class="p">[</span><span class="o">-</span><span class="mi">15</span><span class="p">,</span> <span class="o">-</span><span class="mi">5</span><span class="p">,</span> <span class="mi">0</span><span class="p">,</span> <span class="mi">10</span><span class="p">,</span> <span class="mi">16</span><span class="p">,</span> <span class="mi">20</span><span class="p">,</span> <span class="mi">24</span><span class="p">,</span> <span class="mi">32</span><span class="p">]</span>
    <span class="kd">const</span> <span class="nx">fahrenheit</span> <span class="o">=</span> <span class="nx">celsius</span><span class="p">.</span><span class="nx">map</span><span class="p">(</span><span class="nx">t</span> <span class="o">=&gt;</span> <span class="nx">t</span> <span class="o">*</span> <span class="mf">1.8</span> <span class="o">+</span> <span class="mi">32</span><span class="p">);</span>
    <span class="c1">// fahrenheit is [5, 23, 32, 50, 60.8, 68, 75.2, 89.6]</span>
</code></pre></div></div>

<h2 id="filter">filter()</h2>

<p>The <code class="language-plaintext highlighter-rouge">filter()</code> method creates a new array with all elements that pass the test implemented by the provided function.</p>

<div class="language-javascript highlighter-rouge"><div class="highlight"><pre class="highlight"><code>    <span class="kd">const</span> <span class="nx">words</span> <span class="o">=</span> <span class="p">[</span><span class="dl">"</span><span class="s2">spray</span><span class="dl">"</span><span class="p">,</span> <span class="dl">"</span><span class="s2">limit</span><span class="dl">"</span><span class="p">,</span> <span class="dl">"</span><span class="s2">elite</span><span class="dl">"</span><span class="p">,</span> <span class="dl">"</span><span class="s2">exuberant</span><span class="dl">"</span><span class="p">,</span> <span class="dl">"</span><span class="s2">destruction</span><span class="dl">"</span><span class="p">,</span> <span class="dl">"</span><span class="s2">present</span><span class="dl">"</span><span class="p">];</span>
    <span class="kd">const</span> <span class="nx">longWords</span> <span class="o">=</span> <span class="nx">words</span><span class="p">.</span><span class="nx">filter</span><span class="p">(</span><span class="nx">word</span> <span class="o">=&gt;</span> <span class="nx">word</span><span class="p">.</span><span class="nx">length</span> <span class="o">&gt;</span> <span class="mi">6</span><span class="p">);</span>
    <span class="c1">// longWords is ["exuberant", "destruction", "present"]</span>
</code></pre></div></div>

<p>Filter is simple as <code class="language-plaintext highlighter-rouge">map()</code>, It’s going over values in ‘words’ array checking which values pass the test, in this case which value has length greater than 6 and then returns a new array with those values.</p>

<h3 id="example-1">Example:</h3>

<ul>
  <li>Filtering users with admin access</li>
</ul>

<div class="language-javascript highlighter-rouge"><div class="highlight"><pre class="highlight"><code>    <span class="kd">var</span> <span class="nx">officers</span> <span class="o">=</span> <span class="p">[</span>
        <span class="p">{</span> <span class="na">id</span><span class="p">:</span> <span class="mi">11</span><span class="p">,</span> <span class="na">name</span><span class="p">:</span> <span class="dl">'</span><span class="s1">Adam</span><span class="dl">'</span><span class="p">,</span> <span class="na">age</span><span class="p">:</span> <span class="mi">23</span><span class="p">,</span> <span class="na">group</span><span class="p">:</span> <span class="dl">'</span><span class="s1">editor</span><span class="dl">'</span> <span class="p">},</span>
        <span class="p">{</span> <span class="na">id</span><span class="p">:</span> <span class="mi">47</span><span class="p">,</span> <span class="na">name</span><span class="p">:</span> <span class="dl">'</span><span class="s1">John</span><span class="dl">'</span><span class="p">,</span> <span class="na">age</span><span class="p">:</span> <span class="mi">28</span><span class="p">,</span> <span class="na">group</span><span class="p">:</span> <span class="dl">'</span><span class="s1">admin</span><span class="dl">'</span> <span class="p">},</span>
        <span class="p">{</span> <span class="na">id</span><span class="p">:</span> <span class="mi">85</span><span class="p">,</span> <span class="na">name</span><span class="p">:</span> <span class="dl">'</span><span class="s1">William</span><span class="dl">'</span><span class="p">,</span> <span class="na">age</span><span class="p">:</span> <span class="mi">34</span><span class="p">,</span> <span class="na">group</span><span class="p">:</span> <span class="dl">'</span><span class="s1">editor</span><span class="dl">'</span> <span class="p">},</span>
        <span class="p">{</span> <span class="na">id</span><span class="p">:</span> <span class="mi">97</span><span class="p">,</span> <span class="na">name</span><span class="p">:</span> <span class="dl">'</span><span class="s1">Oliver</span><span class="dl">'</span><span class="p">,</span> <span class="na">age</span><span class="p">:</span> <span class="mi">28</span><span class="p">,</span> <span class="na">group</span><span class="p">:</span> <span class="dl">'</span><span class="s1">editor</span><span class="dl">'</span> <span class="p">}</span>
    <span class="p">];</span>
    <span class="kd">const</span> <span class="nx">admins</span> <span class="o">=</span> <span class="nx">officers</span><span class="p">.</span><span class="nx">filter</span><span class="p">(</span><span class="nx">user</span> <span class="o">=&gt;</span> <span class="nx">user</span><span class="p">.</span><span class="nx">group</span> <span class="o">===</span> <span class="dl">'</span><span class="s1">admin</span><span class="dl">'</span> <span class="p">);</span>
    <span class="c1">// admins is [{ id: 47, name: 'John', age: 28, group: 'admin' }]</span>
</code></pre></div></div>

<h2 id="reduce">reduce()</h2>

<p>The reduce() method applies a function against an accumulator and each element in the array (from left to right) to reduce it to a single value.</p>

<div class="language-javascript highlighter-rouge"><div class="highlight"><pre class="highlight"><code>    <span class="kd">const</span> <span class="nx">total</span> <span class="o">=</span> <span class="p">[</span><span class="mi">0</span><span class="p">,</span> <span class="mi">1</span><span class="p">,</span> <span class="mi">2</span><span class="p">,</span> <span class="mi">3</span><span class="p">].</span><span class="nx">reduce</span><span class="p">((</span><span class="nx">sum</span><span class="p">,</span> <span class="nx">value</span><span class="p">)</span> <span class="o">=&gt;</span> <span class="nx">sum</span> <span class="o">+</span> <span class="nx">value</span><span class="p">,</span> <span class="mi">1</span><span class="p">);</span>
    <span class="c1">// total is 7</span>
</code></pre></div></div>

<p>The really cool thing about reduce is that it passes the result of one callback function invocation to the next one allowing us to do things easy.</p>

<h3 id="example-2">Example:</h3>

<ul>
  <li>Find sum of same age people from array</li>
</ul>

<div class="language-javascript highlighter-rouge"><div class="highlight"><pre class="highlight"><code>    <span class="kd">const</span> <span class="nx">users</span> <span class="o">=</span> <span class="p">[</span>
        <span class="p">{</span> <span class="na">id</span><span class="p">:</span> <span class="mi">11</span><span class="p">,</span> <span class="na">name</span><span class="p">:</span> <span class="dl">'</span><span class="s1">Adam</span><span class="dl">'</span><span class="p">,</span> <span class="na">age</span><span class="p">:</span> <span class="mi">23</span><span class="p">,</span> <span class="na">group</span><span class="p">:</span> <span class="dl">'</span><span class="s1">editor</span><span class="dl">'</span> <span class="p">},</span>
        <span class="p">{</span> <span class="na">id</span><span class="p">:</span> <span class="mi">47</span><span class="p">,</span> <span class="na">name</span><span class="p">:</span> <span class="dl">'</span><span class="s1">John</span><span class="dl">'</span><span class="p">,</span> <span class="na">age</span><span class="p">:</span> <span class="mi">28</span><span class="p">,</span> <span class="na">group</span><span class="p">:</span> <span class="dl">'</span><span class="s1">admin</span><span class="dl">'</span> <span class="p">},</span>
        <span class="p">{</span> <span class="na">id</span><span class="p">:</span> <span class="mi">85</span><span class="p">,</span> <span class="na">name</span><span class="p">:</span> <span class="dl">'</span><span class="s1">William</span><span class="dl">'</span><span class="p">,</span> <span class="na">age</span><span class="p">:</span> <span class="mi">34</span><span class="p">,</span> <span class="na">group</span><span class="p">:</span> <span class="dl">'</span><span class="s1">editor</span><span class="dl">'</span> <span class="p">},</span>
        <span class="p">{</span> <span class="na">id</span><span class="p">:</span> <span class="mi">97</span><span class="p">,</span> <span class="na">name</span><span class="p">:</span> <span class="dl">'</span><span class="s1">Oliver</span><span class="dl">'</span><span class="p">,</span> <span class="na">age</span><span class="p">:</span> <span class="mi">28</span><span class="p">,</span> <span class="na">group</span><span class="p">:</span> <span class="dl">'</span><span class="s1">editor</span><span class="dl">'</span> <span class="p">}</span>
    <span class="p">];</span>
    <span class="kd">const</span> <span class="nx">groupByAge</span> <span class="o">=</span> <span class="nx">users</span><span class="p">.</span><span class="nx">reduce</span><span class="p">((</span><span class="nx">acc</span><span class="p">,</span> <span class="nx">it</span><span class="p">)</span> <span class="o">=&gt;</span> <span class="p">{</span>
        <span class="nx">acc</span><span class="p">[</span><span class="nx">it</span><span class="p">.</span><span class="nx">age</span><span class="p">]</span> <span class="o">=</span> <span class="nx">acc</span><span class="p">[</span><span class="nx">it</span><span class="p">.</span><span class="nx">age</span><span class="p">]</span> <span class="o">+</span> <span class="mi">1</span> <span class="o">||</span> <span class="mi">1</span><span class="p">;</span>
        <span class="k">return</span> <span class="nx">acc</span><span class="p">;</span>
    <span class="p">},</span> <span class="p">{});</span>
    <span class="c1">// groupByAge is {23: 1, 28: 2, 34: 1}</span>
</code></pre></div></div>
<p>Hope, you are clear with the methods and usage now. If you’ve stumbled upon some interesting ways map, filter or reduce were used be sure to put it in the comments, I’m sure there are heaps of practical ways these 3 can be used!</p>]]></content><author><name>Prasanth J</name></author><category term="Javascript" /><category term="Javascript" /><summary type="html"><![CDATA[If you’re starting in JavaScript, maybe you already heard of .map(), .reduce(), and .filter(). You may confused what the use of it and how does it work. Once you start working on large applications you will encounter number of scenarios where you need to you these functions.]]></summary></entry></feed>